NIOS Class 12 Home Science Chapter 33 The Design Solutions to each chapter is provided in the list so that you can easily browse throughout different chapters NIOS Class 12 Home Science Chapter 33 The Design and select need one. NIOS Class 12 Home Science Chapter 33 The Design Question Answers Download PDF. NIOS Study Material of Class 12 Home Science Notes Paper 321.
NIOS Class 12 Home Science Chapter 33 The Design


Also, you can read the NIOS book online in these sections Solutions by Expert Teachers as per National Institute of Open Schooling (NIOS) Book guidelines. These solutions are part of NIOS All Subject Solutions. Here we have given NIOS Class 12 Home Science Chapter 33 The Design, NIOS Senior Secondary Course Home Science Solutions for All Chapter, You can practice these here.
The Design
Chapter: 33
MODULE – VI (B): CREATIVE HAND EMBROIDERY
TEXTUAL QUESTIONS
INTEXT QUESTIONS 29.1
Q. 1. Do you know how to use a dictionary? Find out appropriate meanings for the following words used in the context of embroidery.
(i) Geometrical.
(ii) Naturalised.
(iii) Stylized.
(iv) Abstract.
Classify the following design as geometrical, naturalised, stylized and abstract.
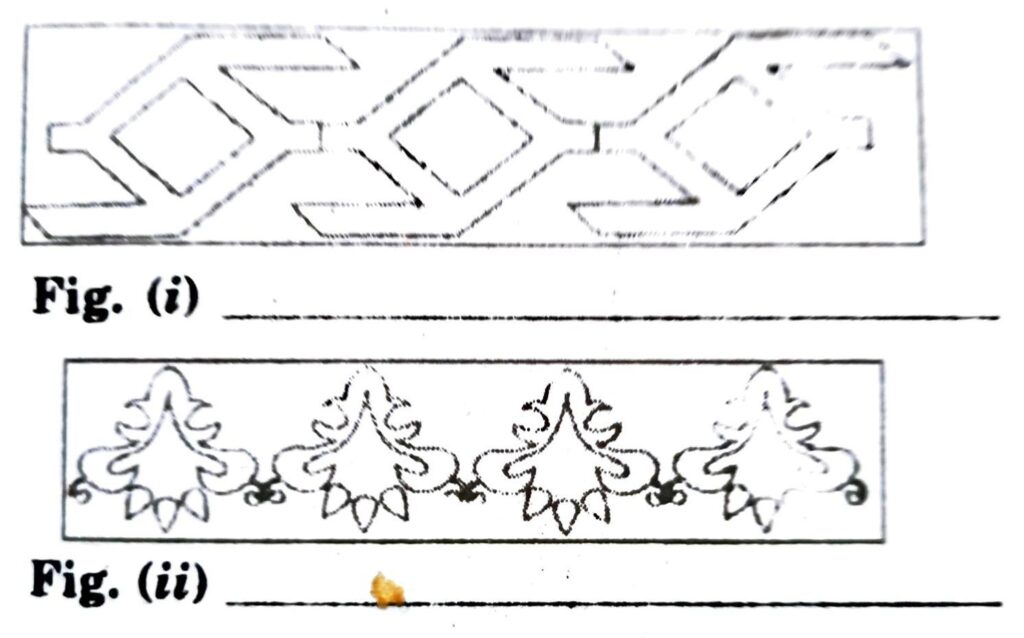
Ans: Fig. (i) & (iii) Geometrical
Fig. (ii) & (iv) Naturalised
INTEXT QUESTIONS 29.2
Q. 1. Rearrange these letters to form words that describe different methods of transferring a design.
(a) EPATELMT (1 word) ____________.
Ans: Template.
(b) BTCAINGCRKA (2 words) ____________.
Ans: Back tracing.
(c) RACNOBPPREA (2 words) ____________.
Ans: Carbon paper
(d) RITCEDMHOETD (2 words) ____________.
Ans: Direct method.
TERMINAL QUESTIONS
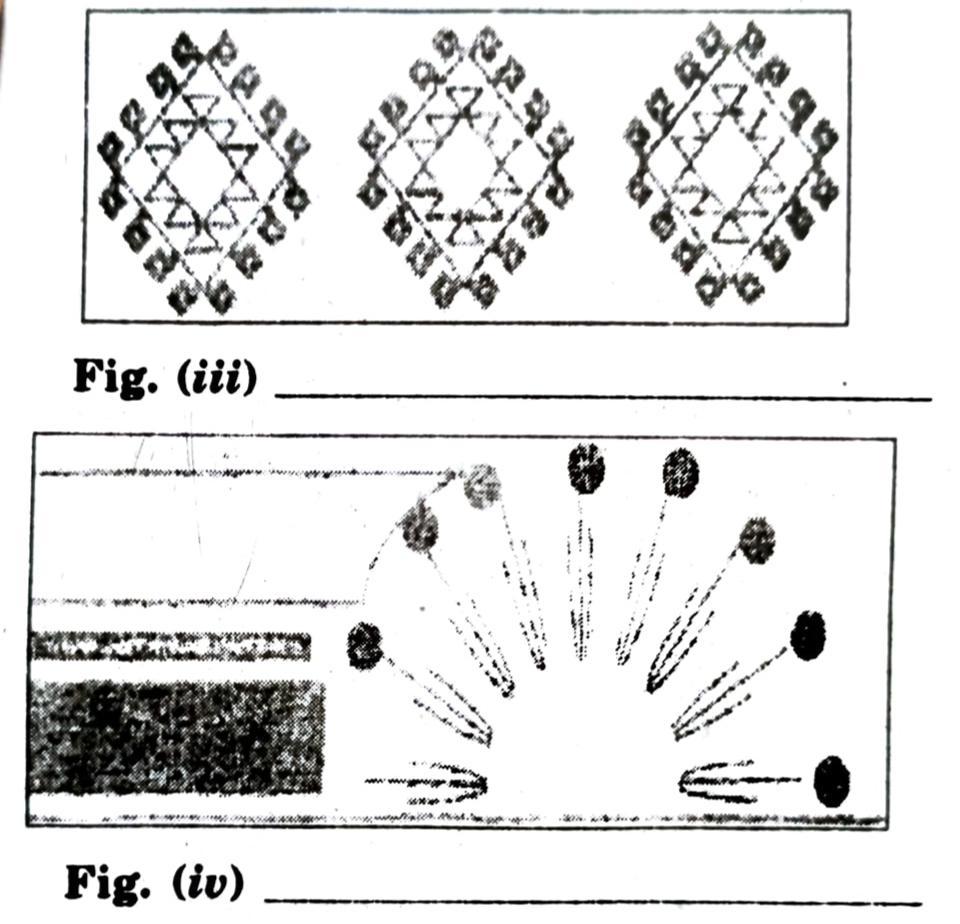
Q. 1. Identify the following placement:
Ans: (i) half drop placement.
(ii) diagonal placement.
(iii) vertical placement.
(iv) horizontal placement.
Q. 2. You have to embroider a frock for your three year old niece. List the factors you will keep in mind while selecting a design for it.
Ans: Embroidery on frocks can be done in variety of ways. It can be decorated by using: Sequins, Tassels, Laces, Beads, Metallic cords.
If the embroidery design does not give the desire beauty then all the time, money and effort in designing of the embroidery and implementing it is wasted. Choosing patterns for baby embroidery; It could be:
1. Baby rattles.
2. Ballet shoes for baby girls.
3. Balloons.
4. Colourful cake.
5. Bows.
6. Bunny rabbits.
7. Baby elephant.
8. Fawns in the forest.
9. Football.
10. Ice-cream.
11. A happy half moon.
12. Sun with a happy face.
13. Stars.
14. Baby bear.
15. Hats.
16. Teddy bear.
17. Snowman.
Selection will depend on factors such as personal tastes, style, availability of materials for a particular design etc.
Smaller designs are always easier for embroidery. The primary location of the embroidered design need not be in the middle. For example, placing the design on the left sleeve of a short sleeve also possible.
Q. 3. Describe any two of transferring a design from paper onto a fabric.
Ans: Before you start the process of transferring designs, you will need some basic equipment. They are carbon and tracing wheel, tracing paper (ordinary paper can be used), dressmaker’s chalk, marking pencils and pencils.
Transfer your design using Hand Pricking (Pouncing) Method
• Lay the pattern on a cork board.
• With a sharp pin, prick along the design of the pattern. (Tip: Keep holes close together.)
• Put the pricked design on the fabric right side up.
• With a felt pad, gently rub the dressmaker’s chalk over the pricked design.
• Remove the pattern carefully and gently blow off the excess chalk.
• If you desire, you can use a dressmaker’s pencil to connect the dots.
2. Transfer using Dressmaker’s Carbon
• Position the on fabric with the pattern facing you.
• Pin each corner so that pattern stays in place.
• Slip dressmaker’s carbon paper with carbon side down between the pattern and fabric.
• Using the tracing wheel of your choice, copy the design lines of the pattern.
Q. 4. You have selected a design of a butterfly to be used on a bedcover and pillow cover. Explain the method by which the same motif can be used on both the articles. Show it using a graph paper.
Ans: Enlarging:
Step-1: Reverse the math if you are enlarging a pattern.
Step-2: Draw your second grid, making the squares as many times larger as the amount by which you wish to enlarge the pattern. For example, if the grid over the original pattern consists of 1/8-inch squares and you are doubling the pattern size, squares in the second grid will be 1/4 inch.
Reducing
Step-1: Trace the pattern.
Step-2: Draw a grid (like graph paper) to mark small squares across the pattern.
Step-3: Draw a second grid, making the squares as many times smaller as the amount by which you wish to reduce the pattern. For example, if the grid over the original pattern consists of 1/4- inch squares and you are halving the pattern size, squares in the second grid will be 1/8 inch.
Step-4: Square by square, copy the pattern. by drawing it on the new grid.
Pillow Cases: The embroidery should be centered between the edge of the open end and the stitching on the hem or the border pattern.
Sheets: The bottom of the embroidery should be centered about 2″ above the wide hem line on the top side of the sheet.
Q. 5. Select motif for your father’s kurta and show any two ways in which it can be placed on it.
Ans: It can be placed horizontal or vertical.

Hi! my Name is Parimal Roy. I have completed my Bachelor’s degree in Philosophy (B.A.) from Silapathar General College. Currently, I am working as an HR Manager at Dev Library. It is a website that provides study materials for students from Class 3 to 12, including SCERT and NCERT notes. It also offers resources for BA, B.Com, B.Sc, and Computer Science, along with postgraduate notes. Besides study materials, the website has novels, eBooks, health and finance articles, biographies, quotes, and more.