NIOS Class 12 Data Entry Operations Chapter 9 Creating Presentation Solutions to each chapter is provided in the list so that you can easily browse throughout different chapters NIOS Class 12 Data Entry Operations Chapter 9 Creating Presentation and select need one. NIOS Class 12 Data Entry Operations Chapter 9 Creating Presentation Question Answers Download PDF. NIOS Study Material of Class 12 Data Entry Operations Notes Paper 336.
NIOS Class 12 Data Entry Operations Chapter 9 Creating Presentation


Also, you can read the NIOS book online in these sections Solutions by Expert Teachers as per National Institute of Open Schooling (NIOS) Book guidelines. These solutions are part of NIOS All Subject Solutions. Here we have given NIOS Class 12 Data Entry Operations Chapter 9 Creating Presentation, NIOS Senior Secondary Course Data Entry Operations Solutions for All Chapter, You can practice these here.
Creating Presentation
Chapter: 9
DATA ENTRY OPERATIONS
INTEXT QUESTIONS
1. State True or False:
(a) In both Normal view and Outline view you can see: current slide, slide outline and notes.
Ans. True.
(b) Using the contrasting colors for the text and hack ground to slides is not a good practice.
Ans. False.
(c) While preparing slides use long phrases sentences to convey your message.
Ans. False.
2. How many slide layouts are available in New Slide dialog box?
(a) 7.
(b) 9.
(c) 14.
(d) 17.
Ans. (c) 9.
3. The Power Point dialog box is useful to create a new presentation using:
(a) Installed templates.
(b) Open.
(c) Installed Themes and Blank Presentation.
(d) Both (a) and (c) above.
Ans. (c) Installed Themes and Blank Presentation.
4. Which of the following views is shown in the presentation of slides in a conference?
(a) Slide view.
(b) Slide Sorter view.
(c) Outline view.
(d) Slide Show view.
Ans. (d) Slide Show View.
INTEXT QUESTIONS
5. (i) How do you move from one slide to another slide?
(a) Using Scroll bars.
(b) Using Next slide and Previous slide button.
(c) Using outline pane.
(d) All of the above.
Ans. (d) All of the above.
(ii) How do you insert text in a slide?
(a) Using outline text.
(b) Inserting text boxes.
(c) Right clicking.
(d) (a) and (b) above.
Ans. (d) (a) and (b) above.
(iii) You can add notes to your slides from:
(a) Slide Sorter view.
(b) Normal view.
(e) Slide Show view.
(d) (a) and (b).
Ans. (b) Normal view.
(iv) Text can be easily inserted into the slides using:
(a) Normal view.
(b) Outline view.
(c) Slide Sorter view.
(d) (a) and (b) above.
Ans. (d) (a) and (b) above.
TERMINAL QUESTIONS
1. Explain any three features of Power Point.
Ans. (i) Power Point gives we several ways to create a presentation.
(ii) Creating slides is the root of all your work with Power Point. We can get our ideas across with a series of slides.
(iii) Adding text will help you put our ideas into words.
(iv) The multimedia features makes our slides sparkle. We can add clip art, sound effects, music, video clips etc.
2. Explain any one method of creating a presentation.
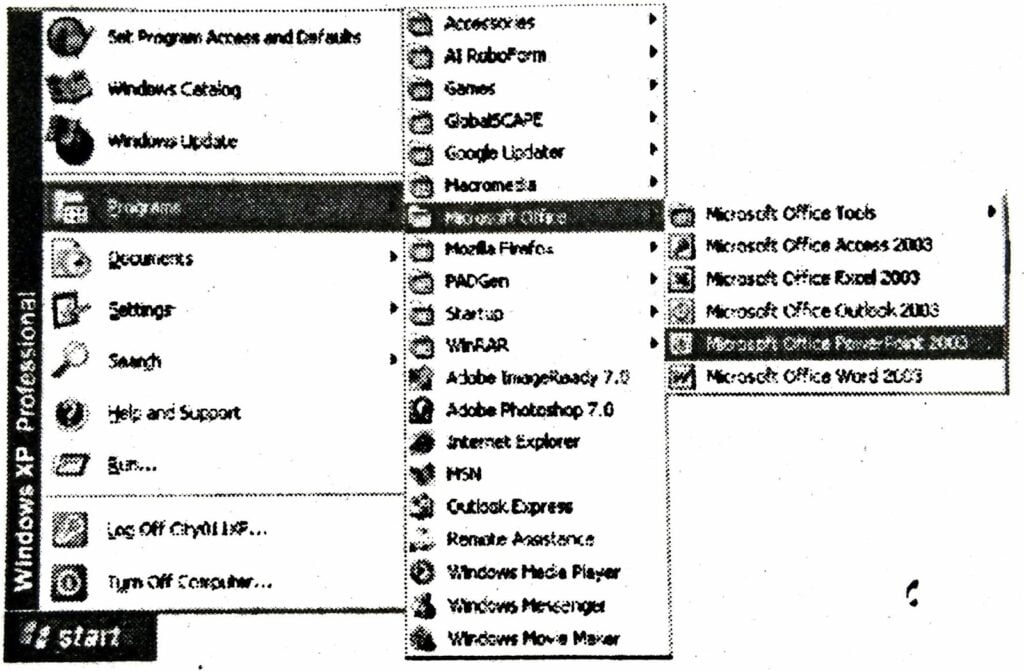
Ans. We can start our Power Point program in different ways. One way is using start button:
(i) Click on the Start button.
(ii) In the menu that appears select All Programs → Microsoft Office → Microsoft Office Power Point 2007. In few seconds we will see Power Point screen on the monitor.
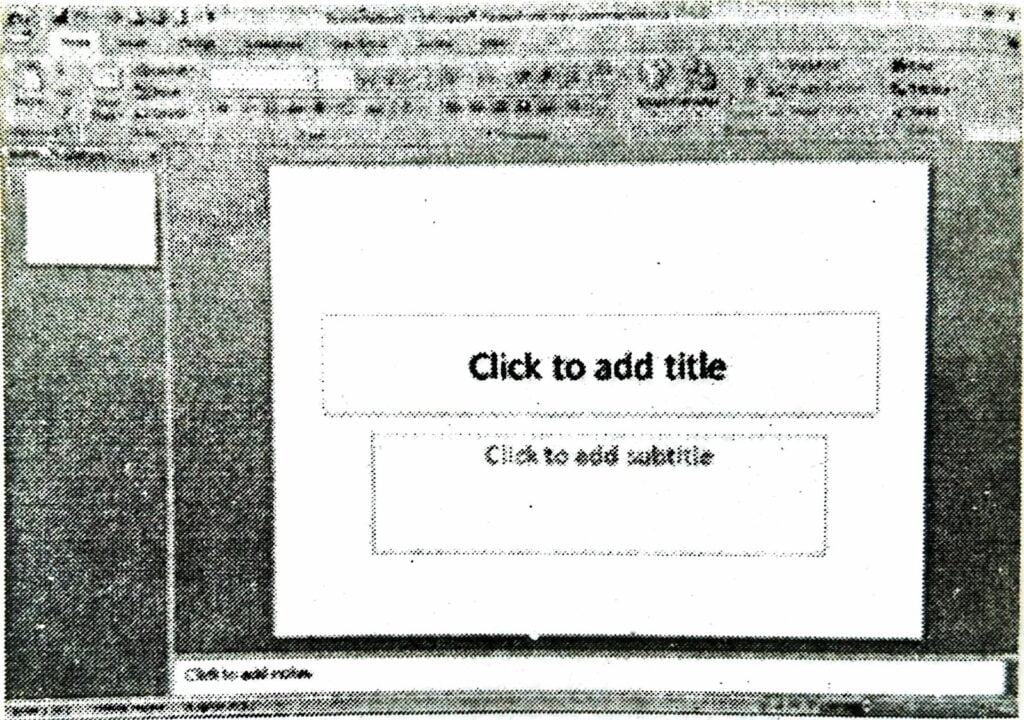
Crating Presentations: When we start our Power Point Program, we see a Blank presentation.
3. Write two ways of changing the view to slide show view.
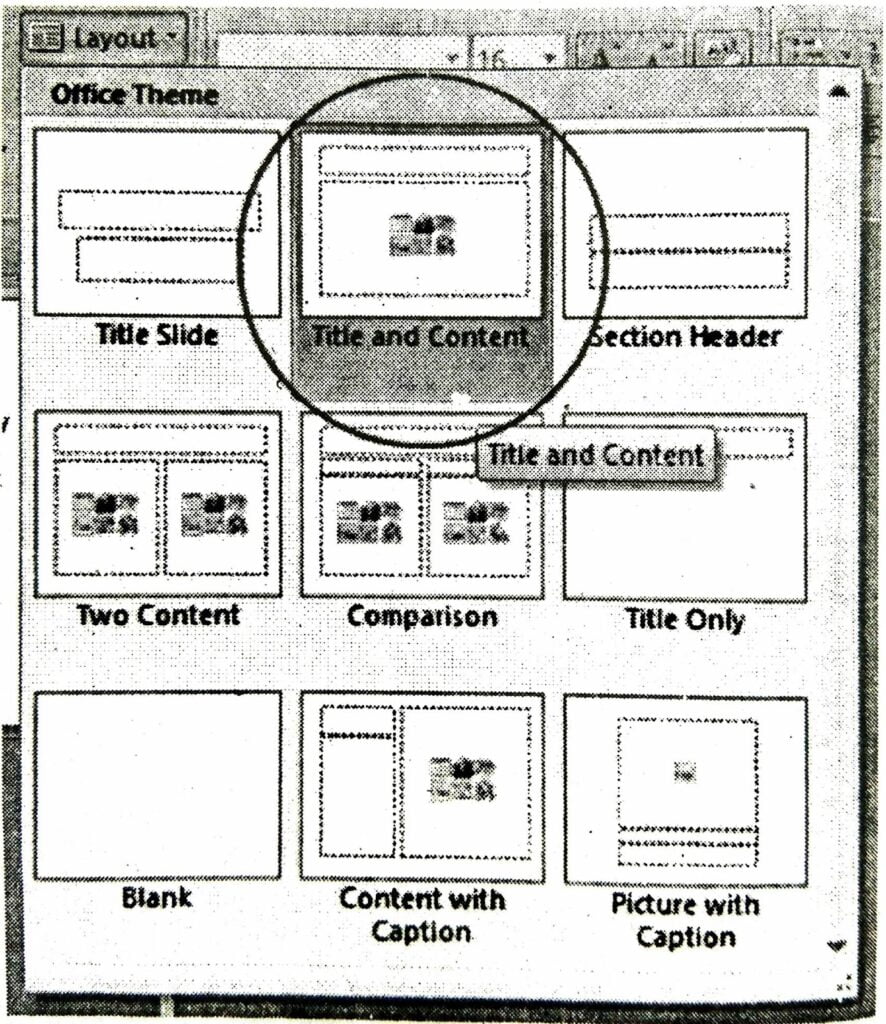
Ans. Changing Slide Layouts: To change the layout template of the slide select Home → Layout command on the menu bar. The Slide Layout dialog box appears with nine layouts. Click on one of the layout thumbnail images to apply.
4. Explain steps in inserting a text box in a slide.
Ans. Out Text: The outline text can be used to create slides of a similar nature. By using the Outlining toolbar, we can create heads, lists and paragraphs. Power Point uses the format of our outline to correctly insert text in a side. Heading I becomes the title of a slide, heading 2 becomes the first line of the text box and so on. When we select a predefined layout and switch over to Outline view as explained earlier, we can see the outline text options on the left side window. To choose Outlining toolbar, select the Outline pane next to the slide pane on left side below the menu bar.
Text Boxes: The text boxes are the way that Power Point Puts text on a slide. When we create a slide and use a specific slide layout, the slide will have one or more text boxes in it. Simply click on the existing text to add new text.
5. How do you change the amount of space between lines in a text box?
Ans. Line Spacing: Change the amount of space between lines in a text box by selecting Home→ Lines Spacing from the Paragraph menu bar.
Line spacing: Select the amount of vertical space between lines. A value of “1” is equal to single spacing and “2” is double spacing. Values
between and above these numbers are valid as well.
Change Case: Change the case of the characters in a paragraph by selecting Home → Change Case from the Font menu bar without having to retype the text.
Sentence case: Capitalizes the first letter of the first word in each sentence.
Lowercase and Uppercase: Changes the case of all the letters.
Title case: Capitalizes the first letter of every word and reduces the rest to lowercase.
6. How do you insert picture bullets in slides?
Ans. Select one of the bullet types shown and click OK. Or click the picture button to view the picture Bullet window. Select one of the bullets and click OK. Or click the character button to select any character from the fonts on the computer. Select a symbol font such as Wingdings or Webdings from the Bullets from drop-down menu for the best selection of icons. Click on the characters in the grid to see them larger. Click OK when we have chosen the bullet we want to use.
7. How do you add notes to your slides?
Ans. Adding Notes: From Normal View, notes can be added to the slide. These notes will not be seen on our presentation, but they can be printed out on paper along with the slide the notes refer to by selecting Print What: Notes Pages on the Print menu.
OTHER IMPORTANT QUESTIONS AND ANSWERS
Q. 1. Differentiate between the Normal view.and Slide sorter view.
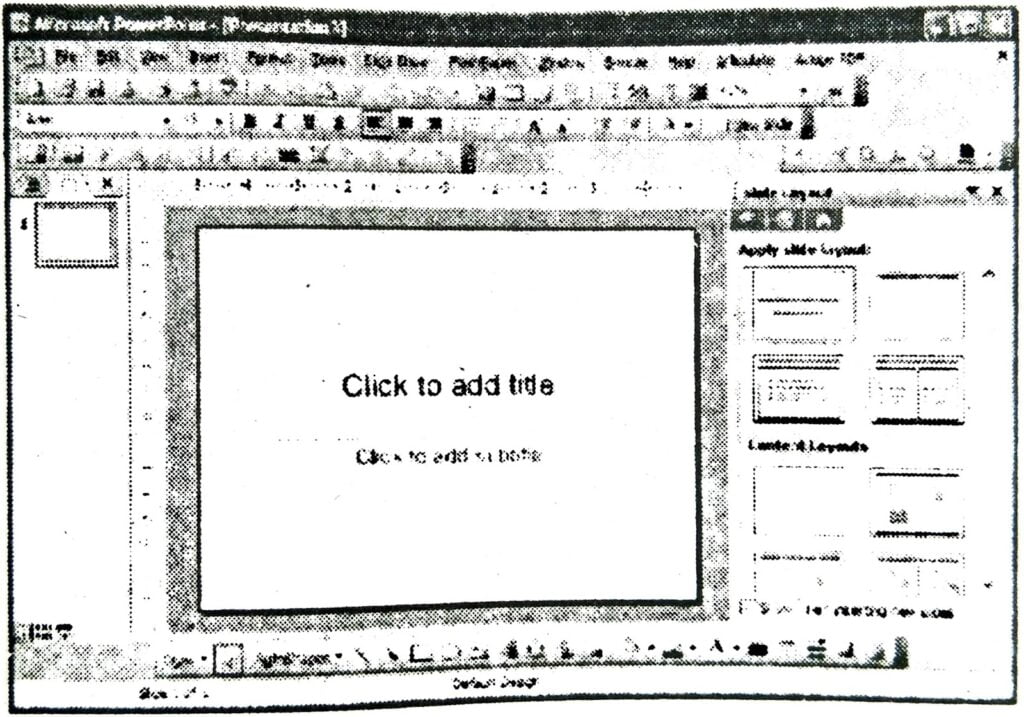
Ans. Normal View: The Normal View divides the screen into three sections: the main window. where the current slide is displayed, the outline pane on the left; and the notes pane at the bottom. To access Normal view, click on Normal view button at the bottom left of the window or select View→ Normal command on the menu bar.
Slide Sorter View: A small image of each slide is displayed on Slide Sorter View. Slides can easily be ordered and sorted using the view. To access Slide Sorter view, click on slide sorter view button at the bottom left of the window or select View → Slide Sorter command on the menu bar.
Q. 2. Differentiate between the Normal view and Outline view.
Ans. The Normal View divides the screen into three sections: the main window, where the current slide is displayed; the outline pane on the left and the notes pane at the bottom. This is where you will do most of your work. You can resize each pane by clicking its border and dragging it to the size that you want it to be.
Q. 3. Write is your answer book True/False for the following statements:
(a) Zip and Unzip utility programs fall under system software.
Ans. True.
(b) In Assembly language programs are written in binary numbers.
Ans. False.
(c) My picture folder displays a list of recently used document by the current user.
Ans. False.
(d) Search is data through indexing of files.
Ans. True.
(e) Print preview helps to view and edit the worksheet before the final Printout.
Ans. False.
(f) Handouts are the basic building block of the presentation.
Ans. False.
Q. 4. Write five features of MS Power Point.
Ans. Microsoft PowerPoint 2007 is a complete presentation software. It has the following features:
(i) It gives you several ways to create a presentation.
(ii) Creating slides is the root of all your work with PowerPoint. You can get your ideas across with a series of slides.
(iii) Adding text will help you put your ideas into words.
(iv) The multimedia features makes your slides sparkle. You can add clip art, sound effects, music, video clips etc.
(v) Preparing a presentation is easy in PowerPoint. Once if you have created slides, you can put them in order, time your slide show, and present them to your audience.
Q. 5. Write down the steps to reorder the slides in MS-Power Point.
Ans. To reorder a slide in Slide Sorter View, simply click on the slide you wish to move and drag it to the new location. In Normal or Outline View, click on the slide in the slide pane and move and drag the slide to a new location.
Q. 6. Differentiate between the Normal view and Slide sorter view.
Ans. Normal view and Slide sorter view: The Normal View divides the screen into three sections: The main window, where the current slide is displayed; the outline pane on the left; and the notes pane at the bottom. This is where you will do most of your work. You can resize each pane by clicking its border and dragging it to the size that you want it to be.
A small image of cach slide is displayed on Slide Sorter View. Slides can easily be ordered and sorted using this view. You can also use this view to add special effect, such as the transactions that occur when each new slide appears.
Q. 7. Write the steps to start MS Power Point.
Ans. (i) Click on the Start button.
(ii) In the menu that appears select All Programs → Microsoft Office → Microsoft Office PowerPoint 2007.
Q. 8. Write the types of Slide Layouts available in MS Power Point.
Ans. There are Nine types of Slide Layouts Available in MS Power Point:
(i) Title Slide: This option is useful for beginning a presentation; use this slide if you want to include subtitles or smaller text underneath a title.
(ii) Title and Content: Anytime you need to make to list of things that fall underneath a general subject, choose this layout.
(iii) Section Header: This option is useful for making a major section within the presentation.
(iv) Two Content: This is a useful option for putting different elements or text boxes.
(v) Comparison: This is a useful option for doing pro/con lists.
(vi) Title Only: This option is great for the beginning of a presentation. No subtitles are included in this layout.
(vii) Blank: Use this layout if you want a blank slide formatted according to the master Slide.
(viii) Content with caption: Use this option if you want some captions.
(ix) Picture with caption: Use this option to place title over one linked object.
Q. 9. How many elements are shown inside the text box?
Ans. There are Six Types of elements shown under a text box:
(i) Insert table.
(ii) Insert chart.
(iii) Insert Smart Art Graphic.
(iv) Insert picture from file.
(v) Insert Clip Art.
(vi) Insert Media Clip.
Q. 10. Define the Reordering slides.
Ans. Reordering Sliders: To reorder a slide in Slide Sorter View, simply click on the slide you wish to move and drag it to the new location. In Normal or Outline View, click on the slide in the slide pane and move and drag the slide to a new location.
Q. 11. Write short notes on the Plotter.
Ans. Plotter: A plotter is a special kind of output device that, like a printer. produces images on paper, but does so in a different way. Plotters are designed to produce large drawings or images, such as construction plans for building or blueprints for mechanical objects. A plotter can be connected to the port normally used by a printer.
Q. 12. Write any three ways of changing the view to slide show view.
Ans. Normal View: The Normal View divides the screen into three sections: the main window, where the current slide is displayed; the outline pane on the left; and the notes pane at the bottom. This is where you will do most of your work.
Slide Sorter View: A small image of each slide is displayed on Slide Sorter View. Slides can easily be ordered and sorted using this view. You can also use this view to add special effect, such as the transactions that occur when each new slide appears.
Slide Show View: The Slide Show View is the view to use when you preview your presentation to make sure every thing is in place, or when you deliver a presentation to an audience. Because all sounds, animations, hyperlinks, and action settings of your presentation will be working, you can see exactly how your show will turn out.
Q. 13. Write any two design Tips for making excellent presentations.
Ans. (i) Use contrasting colors for the text and the background so the text will be easy to read.
(ii) Use short phrases and sentences to convey your message.
Q. 14. Write the method and use of hiding and unhide a slide.
Ans. If we don’t want a slide to appear during the slide show, but don’t want to delete the slide as it may be used later we can use hide and unhide option in Power Point. The slide can be hidden by right clicking on the slide in the slide pane and selecting Hide. You can unhide a hidden slide in a similar manner.
Q. 15. Write the Change Case available in Power Point.
Ans. Sentence case: Capitalizes the first letter of the first word in each sentence.
Lowercase and Uppercase: Changes the case of all the letters.
Title case: Capitalizes the f..st letter of every word and reduces the rest to lowercase.
Toggle-case: The opposite of Title case, it makes the first letter of every word lowercase and capitalizes the remaining letters
Q. 16. Explain steps in inserting a text box in a slide.
Ans. The text boxes are the way that PowerPoint puts text on a slide. When you create a slide, and use a specific slide layout, the slide will have one or more text boxes in it. If you want to add a new text box to the slide, select Insert®Text.
Box command on the menu bar and then draw the text box with the mouse at a place where you want to insert the text box.
Q. 17. Explain steps in inserting a Bulleted List in a text box in a slide.
Ans. follow these steps to create a new Bulleted list:
(i) In slide view, create a text box by selecting Insert → Text Box from the menu bar.
(ii) “Draw” the text box on the slide by holding down the left mouse button while you move the mouse until the box is the size you want it.
(iii) Choose the Bullets or Numbering from the Home→ Paragraph menu bar.
(iv) Change the Size of the bullet by changing the percentage in relation to the text.
(v) click the Picture button to view the Picture Bullet window. Select one of the bullets and click OK.
Q. 18. Explain steps in inserting a Numbered List in a text box in a slide.
Ans. (i) Create a text box.
(ii) With the text box selected, choose Home Paragraph → Numbering from the menu bar.
(iii) Click the Numbered tab at the top of the Bullets and numbering window.
(iv) Change the size of the numbers by changing the percentage in relation to the text.
(v) Choose a color for the numbers from the Color menu.
(vi) Change the Start at value if the numbers should not begin with 1.

Hi! my Name is Parimal Roy. I have completed my Bachelor’s degree in Philosophy (B.A.) from Silapathar General College. Currently, I am working as an HR Manager at Dev Library. It is a website that provides study materials for students from Class 3 to 12, including SCERT and NCERT notes. It also offers resources for BA, B.Com, B.Sc, and Computer Science, along with postgraduate notes. Besides study materials, the website has novels, eBooks, health and finance articles, biographies, quotes, and more.