
Class 12 Apparel Made Ups and Home Furnishing Chapter 3 Fitting Defects Remedies and Finishing Solutions English Medium As Per AHSEC New Syllabus to each chapter is provided in the list so that you can easily browse through different chapters Class 12 Apparel Made Ups and Home Furnishing Chapter 3 Fitting Defects Remedies and Finishing Question Answer and select need one. Class 12 Apparel Made Ups and Home Furnishing Chapter 3 Fitting Defects Remedies and Finishing Notes Download PDF. AHSEC Class 12 Elective Apparel Made Ups and Home Furnishing Question Answer English Medium.
Class 12 Apparel Made Ups and Home Furnishing Chapter 3 Fitting Defects Remedies and Finishing
Also, you can read the NCERT book online in these sections Solutions by Expert Teachers as per Central Board of Secondary Education (CBSE) Book guidelines. AHSEC Class 12 Elective Apparel Made Ups and Home Furnishing Textual Solutions are part of All Subject Solutions. Here we have given AHSEC Class 12 Apparel Made Ups and Home Furnishing Textbook Solutions English Medium for All Chapters, You can practice these here.
Fitting Defects Remedies and Finishing
Chapter: 3
| Session 1: Fitting Defects and remedies |
| Check Your Progress |
A. Fill in the blanks:
1. The five basic factors present in every fitting problem are ________________, line, grain, set and______________.
Ans: Balance, ease.
2. To evaluate the fit of a garment, a _________________ sample is prepared before the finally garment construction.
Ans: Muslin.
3. For a good fit, grain lines at bust, waist, hip and upper arm should be _________________to the floor.
Ans: Parallel.
4. For a large garment area, either loose _________________or _____________folds forms making the garment stand away from the body.
Ans: Pleats, bubbles.
5. For_______________, the hemline must be measured after all other details are finished.
Ans: Hemline.
B. Answer the following questions:
1. What is fitting and what are the five standards for a good fit?
Ans: Fit refers to the relationship of the garment form to the human form. To fit well, the three-dimensional contours of the garment must correspond with those of the body and any undergarments worn beneath the garment. A well-fitted garment is a cause of approval and appears pleasing to the eye. It hangs neatly or sets without creases, drooping or poking out and is well balanced. In a well-fitted garment, person feels easy and comfortable and adjusts naturally to his/her activities. A good fitted garment must hang freely and easily as the body moves.
Five basic factors of fitting decide whether a garment fits well or not. These factors include ease, line, grain, set and balance.
2. What are the characteristic features of well-finished garment?
Ans: The characteristic features of well-finished garment are:
(i) Ease: This refers to the amount of extra allowance added in a garment to make it comfortable to the wearer. A good fitted garment should have perfect fit neither too tight nor too loose. It must contain sufficient ease to allow room for movements like walking, sitting, reaching out and even breathing. The ease allowance varies with fashion, body size/shape , personality, age, fabric, and for the occasion.
(ii) Line: This refers to the placement of the structural lines of the garment with the natural lines of the body. Lines to be observed in fitting are the basic silhouette seams, the girth seams and not style or design lines . For a good fitted garment, side seams should hang in the centre of the side of the body and should be perpendicular to the floor. Also, centre front (CF) and centre back (CB) seams should fall at the centre of the front and back of the body and should be perpendicular to the floor. Darts and seams such as shoulder seams should follow the shoulder line. Other seam lines such as necklines, armholes etc. should gradually curve. The hemline should be parallel to the floor . The circumference(girth) lines including the bustline, waistlines, hiplines and hem line should be smooth curves following the natural body curves. The neckline should fit well both in front and back neither too tight nor too loose, yet it should be comfortable. Some design lines within the silhouette such as pleats, tucks ,gathers should appear to hang perpendicular to the floor.
(iii) Grain: This refers to the direction of the threads/yarns. In a standard basic pattern at the centre front and back at both bust and hip, the lengthwise grain is perpendicular to the floor and the crosswise grain is horizontal or parallel to the floor. For a good fit, the garment should be cut on the correct grain. An on-grain garment hangs smoothly and appears symmetrical. If the garment is off grain it will not hang in a straight line. But in some garments, bias cutting is necessary for the drape and to fit body’s natural curve so garments like chudidar, bias blouse are cut on bias (45 degree) grain.
(iv) Set: This refers to a smooth fit without any unwanted wrinkles. Wrinkles caused by poor set results from the way the garment fits the wearer. Set wrinkles generally take place because the garment is too large or too small for the wearer and the garment hangs or sags when worn. Wrinkles across the shoulders at the back of a jacket or blouse occur because the shoulders are broad, or some times because the shoulders are square.
(v) Balance: This takes place when the garment is in symmetry. The right and left side of the garment appear evenly balanced, when viewed from front, back or side of the garment. Balance relates to grain and line in the garment. A garment is out of balance when it is cut off grain, causing it to hang unevenly. Also, if the line of the garment does not follow the line of the body, it will hang out of balance.
3. Write short note on the “Evaluation of well fitted garment”.
Ans: To evaluate the fit of a garment, a test fit sample is prepared before the finally garment construction. This test fit garment or sample is evaluated for stitching, fit and finishing. If any of these fitting point is not correct, the correction should be pinned in, removing the basting wherever necessary and alterations are made in the fit sample and the pattern.
4. What are the fitting defect and their remedies?
Ans: A good fitted garment should conform to following points:
(i) A garment should fit properly, neither too large nor too small and should conform to the shape of the body without binding, pulling, sagging, straining, or wrinkling.
(ii) It should be comfortable and attractive to the wearer.
Garment fitting procedure:
In order to fit a garment to body various procedures are followed which help in acquiring desired fit. These procedures involve:
(i) Figure Analysis: The body structure of each individual varies from others. Standard measurements and hence standard patterns may not adjust every type of figure. Hence, while checking fit of a garment one must analyse the body structure to determine the cause of fitting problem.
(ii) Fitting Analysis: While checking fit of a garment, it is important to locate the wrinkles and to identify the direction and character of the wrinkles. For a large garment area, either loose horizontal or vertical folds form making the garment stand away from the body. Whereas, for a small (in terms of required size) garment, tension wrinkles appear horizontally, vertically or diagonally over the tight area. Learning to evaluate, observe and analyse wrinkles is the first step while learning fit.
(iii) Figure Requirements: Some parts of the body might deviate from the standard measurements which creates a need for special attention while fitting a garment. For this one must analyse the need for change in garment measurements.
(iv) Garment Alterations: In order to acquire a good fit, pattern adjustments and alterations are required. Making adjustments or alterations before the garment is cut from fabric can eliminate many problems later.
A pattern can be altered and adjusted three ways:
By folding out surplus fullness to make an area smaller.
By slashing and spreading or overlapping along pattern lines to increase or decrease measurements.
By redrawing darts or seam lines.
5. Explain how to increase and decrease waist measurement.
Ans: Increasing or decreasing the waist measurement is one of the most common and simple alteration. Seams and darts can be either let out or nipped in as needed, as long as one understand certain principles. The width of a dart determines the amount of shaping the dart will create, a wide dart creates a larger bulge to fit larger curves on the body, and vice versa. So if you let out a dart line, there will be less shaping and if you nip in the dart line, a larger bulge will be created. This may or may not be all right for every individual, persons with rounded, curving figures can decrease the waist by taking in a dart, but the same figure would be poorly fit if darts were let out to increase waist measurement; the person with a slim, flat figure can let out the dart lines to increase waist measurement but would be poorly fitted with darts taken in to decrease waist measurement. Most average figures are best fitted by making the alteration at the side seam lines. If one’s figure is such that dart lines cannot be altered, all alteration should be done at the sides. Be sure to make corresponding changes at the waistlines of both bodice and skirt.
6. Explain how to adjust the length of the sleeve.
Ans: Some sleeves have a seam line at the lower edge, while others have a hemline. Consult your instruction sheet for direction for the sleeve you are using. Baste under the seam of hem allowance at the lower edge of the sleeve. The desired length is dependent on personal preference in most sleeves. You can change the length by trimming off the desired amount or by using a smaller hem if you want the sleeve longer. The full-length fitted sleeve must reach about ¼ inch below the bend of the wrist, so that the sleeve reaches the bend of the wrist when the arm is bent.
| Session 2: Figure Abnormalities |
| Check Your Progress |
A. True or False:
1. Short legs with full thigh are common characteristic of a triangular shape woman.
Ans: True.
2. Rectangular figure is a curvy female with the hips and bust of the same width, which emphasizes a defined waist.
Ans: False.
3. Straight shoulder shapes are with maximum slope.
Ans: False.
4. A figure with access fat around the waist is called corpulent.
Ans: True.
B. Questions:
1. Explain different basic body shapes of women.
Ans: One body is different from another. Hence, each individual has a different body shape. As a general practice body shapes are categorized into different categories based on the features and shape of the body. Bodies with similar shapes are group and categorized in same categories of body shape. Based on this, there are different types of body shapes. For women these are categorized as: pear/triangle shaped, inverted triangle, hourglass, rectangle and rounded.
Body shapes in general determine the shape of the garment. One must wear garment shapes that compliment one’s shape of the body. A garment must gather one’s attention to the most flaunting areas in body. However, it also depends on an individual’s choice and comfort.
2. Explain different types of figure abnormalities.
Ans: If a figure has the measurements that are not related to its height and also measurements are not related with each other in a proportional order, then it is said to be a disproportionate figure. Such figure is imbalanced in appearance. Even when the body measurements coincide with the standard measurements, garment fit can be affected due to various reasons such as the body posture, the built, and body shape deviations.
These deviations can be seen in individuals which include:
(i) Erect figure: Those who always walk in an erect pose. For such figures, front length measurements for upper garments are taken more depending on the erectness and even shoulder slant should be carefully studied.
(ii) Stooping figure: Those who walk in a bent posture. For these figures, the length of back part of an upper garment is taken more and the shoulder bent and shape should also be considered properly.
(iii) Corpulent figure: A figure with access fat around the waist is called corpulent. For such figures, waist measurement is more than chest. The hip and waist measurements are almost the same.
(iv) Square Shoulders: Straight shoulder shapes with minimum slope. In such case, minimum shoulder slant is given while drafting and cutting the garment.
(v) Sloping/Down shoulders: Excess shoulder slant is visible in such figures. Care must be taken while giving the shoulder slope in the drafts of upper garments like tops, blouse, etc.
(vi) Short and stout figure: Height is less than normal figure, and weight is more. Vertical lines, linear pattern, and dark colours help to create an illusion of length in such figure types. Care must be taken while taking measurement as well as while fabric print selection.
(vii) Tall and Thin figure: More height but skinny and thin body gives such figures a very sleek and slim look. Use of Bulky textures with a lot of volume, big bold prints, horizontal lines and light colours all help in making the garment look flattering.
(viii) Prominent Bust: Chest measurement is more in such postures. The center front chest measures are more than the center back chest area. Shoulder line is made after taking proper and accurate measurement.
(ix) Flat Bust: In this body type, the chest area is flat and not very prominent, so chest measurements should be taken properly before construction of the upper garment.
(x) Hump back: In this type of figure, back is bulged out a lot, so back chest measurement is more than front.
(xi) Pigeon Chest: In these figures, chest measurements are less at front than at back. Therefore, care must be taken while cutting the upper garment.
(xii) Knocking Knees and Bowlegs: Some people have knees bend on the outer side than the normal, such figure is called Bowleg. The figures having knees moving inner side than the normal is known as Knocking Knees. In such cases, care should be taken while taking measurements and constructing lower garments, like pants, trousers. Also for females, the legs can be covered by usage of long flared skirts or full gowns.
3. Explain sloping and square shoulders with diagrams.
Ans: Square Shoulders: Straight shoulder shapes with minimum slope. In such case, minimum shoulder slant is given while drafting and cutting the garment.
Sloping/Down shoulders: Excess shoulder slant is visible in such figures. Care must be taken while giving the shoulder slope in the drafts of upper garments like tops, blouse, etc.
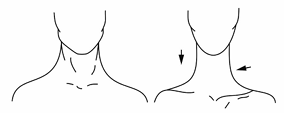
Square and Sloping Shoulders
4. Explain bow legs and knocked knees.
Ans: Knocking Knees and Bowlegs: Some people have knees bend on the outer side than the normal, such figure is called Bowleg. The figures having knees moving inner side than the normal is known as Knocking Knees. In such cases, care should be taken while taking measurements and constructing lower garments, like pants, trousers. Also for females, the legs can be covered by usage of long flared skirts or full gowns.
| Session 3: Finishing of Garment |
| Check Your Progress |

Hi! my Name is Parimal Roy. I have completed my Bachelor’s degree in Philosophy (B.A.) from Silapathar General College. Currently, I am working as an HR Manager at Dev Library. It is a website that provides study materials for students from Class 3 to 12, including SCERT and NCERT notes. It also offers resources for BA, B.Com, B.Sc, and Computer Science, along with postgraduate notes. Besides study materials, the website has novels, eBooks, health and finance articles, biographies, quotes, and more.

 Buy Now